Simple MIDI USB Clock Converter
Simple MIDI USB Clock Converter for Analogue Sequencers
Features
- USB In
- 5V Reset Pulse Out
- 5V Clock Pulse Out
- Clock Divide control - 7 divisions
- Whole - Half - 1/4 - 1/8 - 1/16
- 1/4T - 1/8T - 1/6T
- Very simple project with few components
Arduino and the Pro Micro
I realised it was a simple job to reprogram on of my Pro Micros to convert MIDI Clock and Stop/Start messages. I've used it for a few weeks and its a worker so I thought I build proper unit:
More information about ordering and building here
Analog pulses are output on the clock jack connected to Pin 2. When stop is pressed on the sequencer the Stop command $FC is picked up and a RESET pulse is sent out on Pin 5. This is connected to the RESET IN on my sequencer. This ensures the analogue sequencer is set to STEP 1 before the next MIDI clocks $F8 are received. I don't need to use a START pulse as my sequencer will start on the next clock pulse.
Pin A10 is connected to a 47K pot to adjust the clock divide ratio. Stop the sequencer before changing this value. The MIDI Start command $FA is used to ensure the first Clock Pulse is sent out and that the RESET line goes LOW
Setup and control
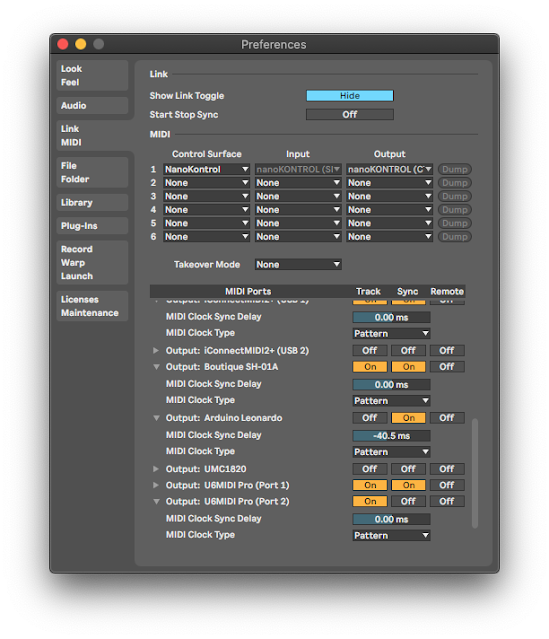
The device will appear in your MIDI setup as Arduino Leonardo, Arduino MIDI or something along those lines. IN your DAW you simply select this to receive MIDI Clock. If there are option for type of clock select Pattern based. The Clock Converter only responds to Start, Stop and Clock ticks. It takes a little time for the MIDI clock to reach the unit so you may want to add an offset. This can be done in Live in the MIDI Preference page.
Ableton Live Setup
-50ms is working well for me but you need to experiment as latency is affected by many factors. Notice the Arduino is set to just receive SYNC and MIDI Clock type is set to Pattern.
Cost
Very simple project with only a few components. I have mounted mine on a 19 rack blanking plate which is cheaper than an enclosure. Cost without and enclosure would be about £15. If you would like to build this I can supply the sketch, parts list and circuit diagram for £10. If you are in the UK and want to buy a pre-programmed and pre-soldered Pro Micro with instructions that will cost £20 + postage. If you want to keep soldering to a minimum you can just mount it on a break out board. These have screw terminals and you cant get then off eBay for about £4. Full details and alternatives are in the instructions.

.jpeg)
.jpeg)

Comments